OVERVIEW
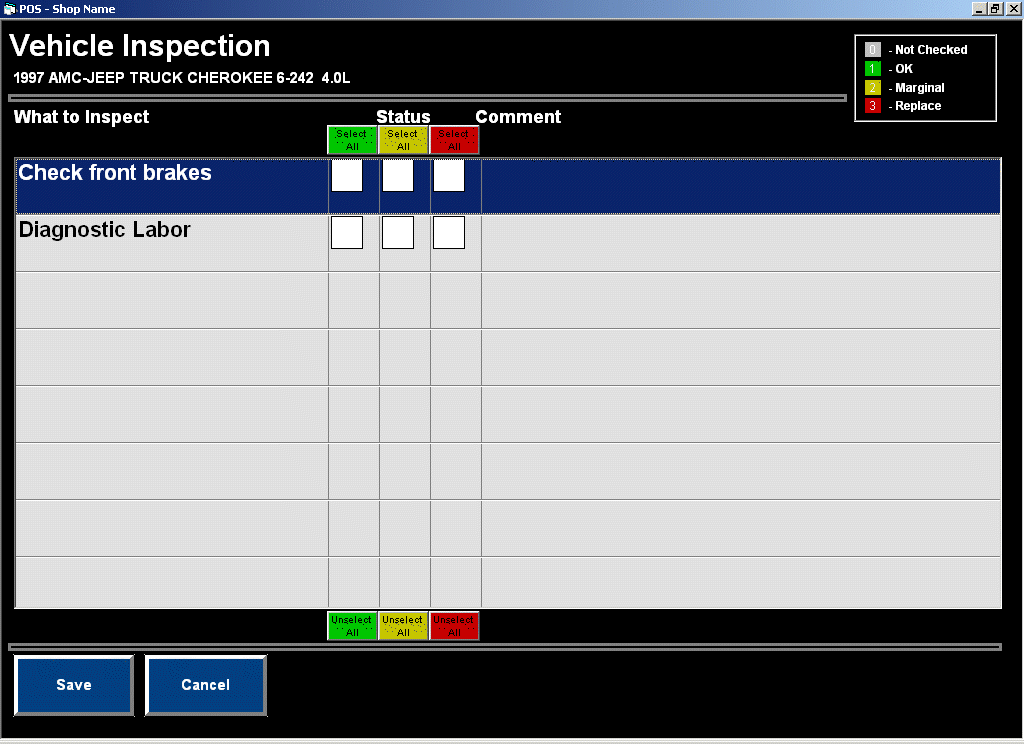
The Vehicle Inspection screen is available to access once a ticket has an inspection waiting. After an inspection has been completed, the results are entered in this screen. A marginal or replace inspection item result can be set to attach the associated remedy part(s) to the ticket or list of recommended services for the vehicle based on the shop question setting for saving a vehicle inspection.
SETUP PROCESS
Access Vehicle Inspection screen:
Set Vehicle Inspection shop questions as applicable.
Tools / POS Settings / Installer Vehicle Related tab
When recalling a work order, determine entering of the inspections results for the open ticket.
When saving a ticket, determine printing of the vehicle inspection for the open ticket
When saving a vehicle inspection, determine adding the remedy parts to recommended services or open ticket.
Manually access the Vehicle Inspection screen via the Vehicle Inspection button on the POS screen.
Note: If the Vehicle Inspection button is not currently on the POS screen, see POS Button Setup to create a customized set of transaction information buttons.
If a vehicle inspection is not available, the message There is no Vehicle Inspection for this ticket will appear when the Vehicle Inspection button is accessed.
Vehicle Inspection screen:

Use the mouse to click on the applicable check box to reflect the inspection status of the highlighted item.
Check a box in the green column for an inspection item with an OK status, resulting in a green check mark.
Check a box in the yellow column for an inspection item with a Marginal status, resulting in a yellow check mark.
Check a box in the red column for an inspection item with a Replace status, resulting in a red check mark.
Use the number keys on the keyboard to enter the inspection status of the highlighted item.
Enter a 1 for an inspection item with an OK status, resulting in a green check mark
Enter a 2 for an inspection item with a Marginal status, resulting in a yellow check mark
Enter a 3 for an inspection item with a Replace status, resulting in a red check mark
Use the Select All buttons or Unselect All buttons to select or unselect a group of inspection items.
Use the green Select All button to set all unchecked items to an OK status. Use the green Unselect All button to unselect all items currently flagged with an OK status.
Use the yellow Select All button to set all unchecked items to a Marginal status. Use the yellow Unselect All button to unselect all items currently flagged with a Marginal status.
Use the red Select All button to set all unchecked items to a Replace status. Use the red Unselect All button to unselect all items currently flagged with a Replace status.
Click on the Save button once all inspection results are entered.
This will save the inspection results and can automatically place the corresponding remedy parts for any inspection items marked as Marginal or Replace in the recommended services list or ticket based on the shop question setting for saving a vehicle inspection.
Once the inspection results are saved, the system will prompt you to print the vehicle inspection. If the ticket had the Customer Status and Promised Date set in the Work Status screen, they will also appear on the vehicle inspection printout.
Note: A key with the number/color codes appears in the upper right hand corner of the screen.