Overview
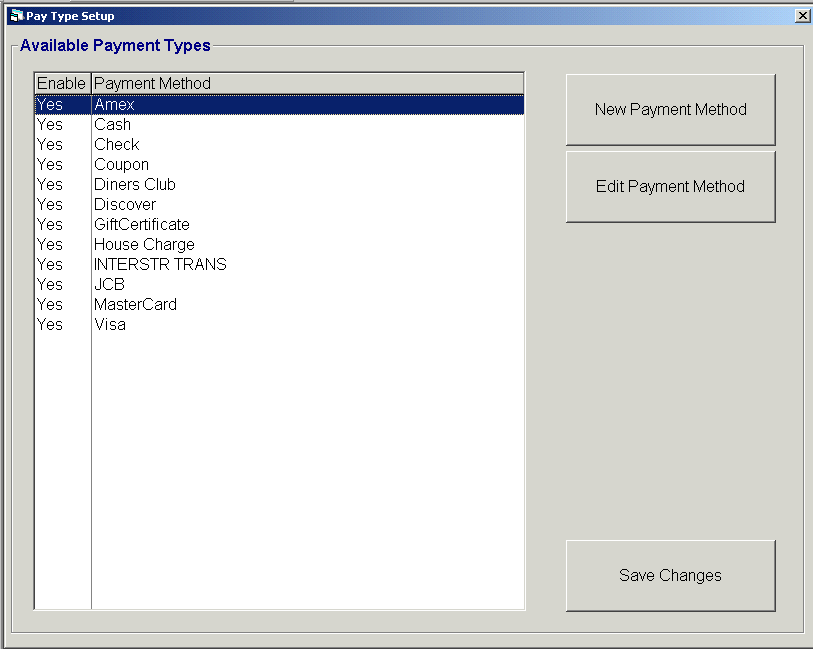
All acceptable methods of payment must be defined and enabled before they are available to access in Point Of Sale. Payment methods that are not needed at the present time can still be defined, but not enabled until a future date.
When processing checks through a processor, the Payment Type Definition will be automatically changed to Electronic Check for an ECA transaction, if the Electronic Check value was previously defined. If the Electronic Check value was not previously defined, the transaction will remain defined as a Check.
If the Payment Type Definition is set to Electronic Check and the user declines the ECA, the Payment Type Definition will be changed to Check, if the Check value was previously defined. If the Check value was not previously defined, the transaction will remain defined as an Electronic Check.
If a user does not want both the Check and Electronic Check buttons to appear in POS, they can disable one of the pay types and only the enabled pay type will appear as a POS button. Disabled pay types appear on the reports and reflect transaction totals comparable to enabled pay types. (Note: Having both Check and Electronic Check defined, but not necessarily enabled, allows the system to automatically change the Payment Type Definition when applicable.)
When setting up a payment type for Debit Cards, a Pin Pad Device must also be configured for the workstation.
Steps: Pay Type Setup
Access the Pay Type Setup screen by clicking on:
Tools | System Setup | Pay Type Setup

Review the standard payment methods supplied by the system and determine any additional payment methods that need to be added or any standard methods that are not needed.
Add New / Edit Payment Method:
Click on New Payment Method to add an additional payment method, or select an existing payment method to edit or delete and click on Edit Payment Method.

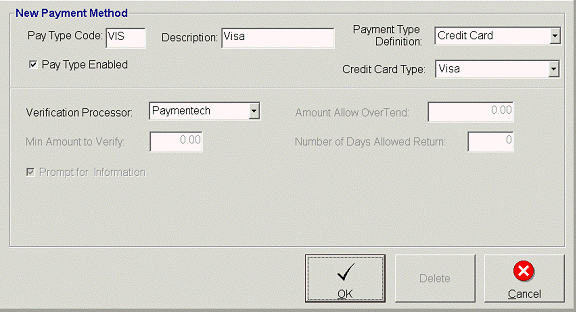
Pay Type Code: enter a (up to) 3-digit alphanumeric code that is used internally in the application.
Pay Type Enabled: Check to have the payment method available at POS. This may also be used to turn off the payment method at POS.
Description: enter a description of the payment type (i.e. Visa, Discover, Debit).
Payment Type Definition: Select the applicable payment type. (i.e. credit card, debit card, cash, check, etc.) Once a payment type is selected, complete all enabled fields associated with the payment type selected. If a credit card swiper will be used with the credit card payment type, see the Workstation Setup documentation to set the Magnetic Stripe Reader Track for the credit card swiper.
(Note: See Debit Card documentation for further debit card setup information.)
Credit Card Type: When credit card is chosen for the Payment Type Definition, select the applicable type of credit card. (i.e. Visa, Discover, Mastercard, etc.)
Verification Processor: For payment methods that will be using a payment processor (credit card, check, debit card, electronic check), select the applicable payment processor company. See Payment Processor Setup for further information.
Min Amount to Verify: Enter the minimum check value that requires verification with the payment processor company.
Prompt for Information: When not using a payment processor, check this parameter for the system to prompt for credit card or check information.
Amount Allow Over Tend: Enter the dollar amount allowed to over tender on the transaction amount; this is used for cash back.
Number of Days Allowed Return: Enter the number of days allowed for the actual check to be returned for a returned transaction.
Click Ok to save information.
Click Cancel to cancel any changes and return to the previous screen.
Click Delete to remove the selected payment method.
Save New / Edited Payment Method:
Once all changes are complete, click the Save Changes button to save all modifications and additions. In order for the changes to become active, the user will be need to logout and re-login.