
Overview
Inventory records will often need to be updated to reflect changes such as a price increase. Inventory record field values can be changed manually or can be automated through the system by the Inventory Update function. The Inventory Update function is a utility program that will update the fields on the inventory records with data from an outside source (import file).
Setup Process
Steps:
Import File Options
Review Inventory Update Holding Area
Update Inventory File Records
Import File Options
The import process will place the records contained in the import file into a holding area. A record containing a blank manufacturer number or part number will not be imported. To import a file to use to update the inventory records, click on:
Enter the name of the import file in the File Name field or click Browse to select the file to import.
Enter a name to describe the import file in the Reference field. (The name entered here will be used later to view the imported file in the holding area.)
Check ONE of the following options for importing the file to the holding area:
Delete all records in Holding Area prior to updating
Check this option to remove all of the records in the holding area and replace with the current data contained in the import file.
Delete all records in Holding Area for Mfg lines contained in the import file
Check this option to remove the manufacturer line items from the holding area for any manufacturer contained in the import file and replace them with the current manufacturer line items contained in the import file. Therefore, if a manufacturer line in the holding area contains some old items and in the import file the same manufacturer line only includes its new product line, the old items will be removed from the holding area and replaced with the new product line listed in the import file. Manufacturer lines currently in the holding area that are not in the import file will remain in the holding area after the import.
Update existing records in Holding Area
Check this option to update the records in the holding area with the current data contained in the import file. This option will not remove any items currently in the holding area, only update any records in the holding area that are also contained in the import file.
Check the following options that are applicable to the import file:
Convert Enterprise dates
This option must be checked when importing a file from the Enterprise system. This option will convert the date format used in the Enterprise system to the standard format used in the import process.
(Example: enterprise=20031103 will be converted to standard=11/03/2003)
Preview records first
Check this option to review the file layout for the records being imported before the import process is executed.
Number of records to preview
The example below displays the records contained in a sample holding area, a sample data file to be imported, and the records contained in the resulting holding area for each of the import options.
Once all the import file options are determined:
Click Cancel to end the import process
Click Next to preview the number of records specified and verify that the data is in the correct fields.
Note: if the Preview records first option was not selected, the Next button will not be available and the user will only have the option to Cancel or Start Update.
Click Back to change the import file options or select a different file to import.
Note: if the Preview records first option was not selected, the Back button will not be available and the user will only have the option to Cancel or Start Update.
Click Start Update to copy the records from the import file to the holding area.
The box labeled Now Importing will track and display the Number of Records being loaded during the import process.
Click Cancel to interrupt the import process.
The box label will change to Import Completed when the import is finished and will display the Total # of Records and Total Time for the import process.
Click New File to add another file to import.
Click Exit to exit the import file process.
Review Inventory Update Holding Area
To review the records imported to the holding area, click on:
Hit the Enter key for the Mfg field and Part Number field to access all records imported to the holding area. Select the import file name to review from the Reference field drop down box and click the save icon on the tool bar. This will allow the user to view and modify all records currently stored in the holding area for this import file.
Update Inventory File Records
The last step is to update the actual inventory records stored in the application with the data being stored in the holding area. In order for the data stored in the holding area to be properly placed in the correct inventory record fields, an Inventory Update Template must be used. An Inventory Update Template maps the data fields in the holding area to the proper inventory record fields. To define a new Inventory Update Template or select an existing Inventory Update Template, click on:
Add New Inventory Update Template:
Click Add New
Enter the new template name in the message box that is displayed and click OK
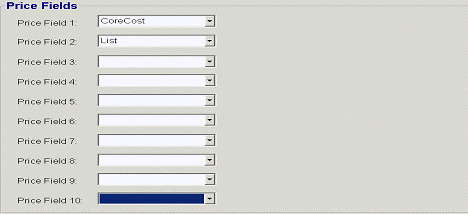
Select the appropriate inventory record field names for the Price fields, Alpha fields, Numeric fields, and Date fields contained in the holding area. Click Next to move from Price Fields to Alpha Fields to Numeric Fields to Date Fields. Each inventory record field name can only be used once - if an inventory field name is used more than once, the holding area field name will appear in red. Although you can continue mapping fields, the template cannot be saved if it contains a holding area field name that is flagged in red.
In the example below, the data contained in the holding area field Price Field 2 will be placed in the inventory record field labeled List.
Click Next when all field mapping is complete.
Note: Ensure a backup of your entire database has been run before moving the data from holding area into the inventory file.
Update Options:
Add new records to the Inventory File
Check this option to add records from the holding area that are not currently contained in the inventory file in addition to updating the information for the existing records. If this option is not checked, items from the holding area that already exist in the inventory file will be updated with the current information, but new items will not be added.
Use Enterprise Pointers
Check this option to retain the file placement information used in the Enterprise system.
Delete Updated Records from the Inventory Update File
Check this option to remove items from the holding area once they have been added to the actual inventory file. If this option is not checked, the holding area could contain items that are waiting to be moved to the inventory file as well as items that were already moved to the inventory file.
Record Selection Criteria (optional)
Click Alter to define criteria to use to select a subset of the holding area to move into the inventory file. This can be used to update the inventory file with Manufacturer A, and move the remaining manufacturers at a later date. Click Clear to delete selection criteria.
Click Next when finished setting update options.
Review the mapping defined in the Inventory Update Template:
Click Cancel to cancel the template creation
Click Back to make any modifications
Click Save Template Only to save the template to use later
Click Save Template and Run Update to update the inventory records now
Clicking Save Template Only or Save Template and Run Update will display the following message box:

Click Yes to go to the beginning and add or edit another template
Click No to exit