Overview
The data files stored on the system can be backed up manually by the user or automatically via the Scheduler, for example, during the End of Day Procedure.
Steps
Access the Database Back Up screen by clicking on:
Tools | System Utilities | Database Functions | Back Ups
Click on the following option to create and run a new backup job with the ability to save the backup job:
Create New Backup
Select a previously saved backup job on the screen and click on one of the following options:
Run Selected Backup
Edit Selected Backup
Delete Selected Backup
Create New Backup

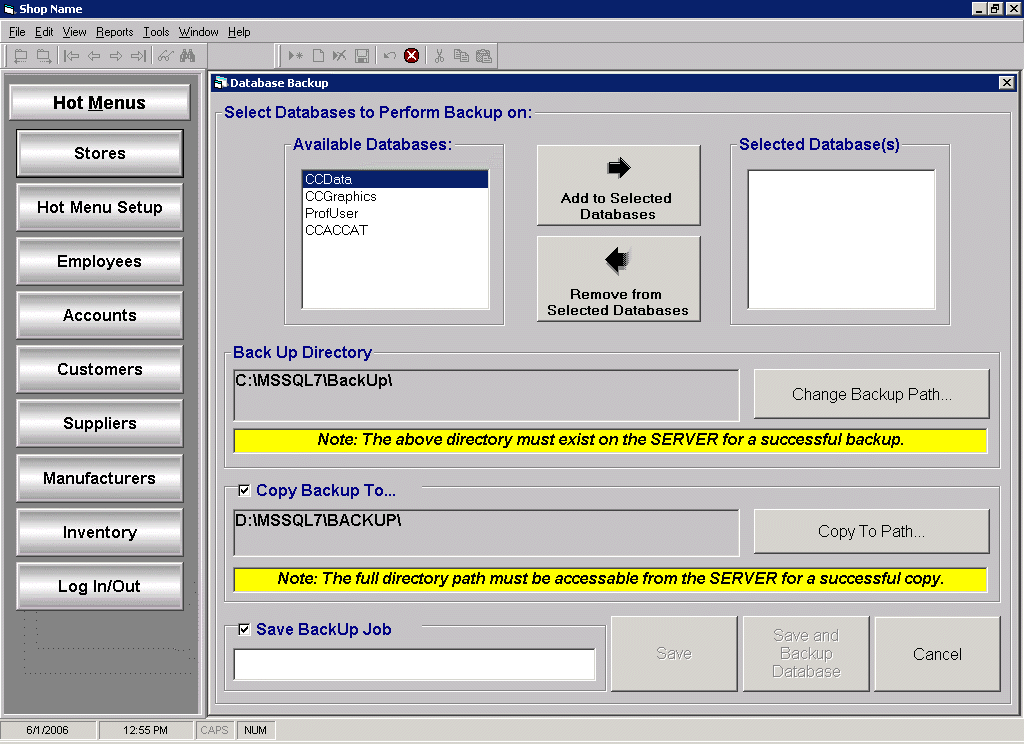
Select one of the Available Databases and click on the Add to Selected Databases button.
CCData contains the majority of the files affected by running the various programs in the application.
CCGraphics contains the graphic files if graphics are being used. (i.e. log-in screen company logo graphic, POS graphic.)
ProfUser contains the Wrenchead catalog information.
CCACCAT contains the Activant catalog Information.
To remove a Selected Database(s), select the applicable database and click on the Remove from Selected Databases button.
When the backup is performed, the database will be copied to the directory listed in the Back Up Directory window. To specify a different directory, click on Change Backup Path.
The file names will appear in the backup directory with a suffix of the actual day of the week the backup job was performed. For example, a CCData backup job run on a Monday will be named CCData_Monday.bak. These files should then be copied from the computer and saved to a removable storage media. (Note: the previous backup data will be overwritten when the backup job is run again the following week.)
If the backup job will be copied to another directory, check the Copy Backup To... parameter and enter the name of the designated path.
The designated path could be another drive connected to the server machine (removable hard drive, second internal drive) or another computer on the network. If copying to another computer on the network (shared network drive), the database server login user must have the rights to access this drive or the copy will fail.
If the backup job will be saved, check the Save BackUp Job parameter and enter a name for the backup job. (Note: entering a name will enable the Save Button or Backup Databases and Save buttons.)
Click on Save button to save the backup job without submitting it at this time.
Click on the Backup Databases and Save button to submit and save the backup job.
Click Cancel to return to the Database Back Up screen.