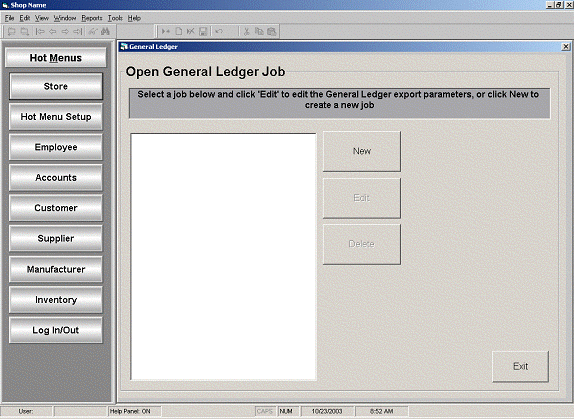
Open the General Ledger screen by selecting:
The options are New, Edit, or Delete a General Ledger Export Job.
General Ledger Jobs are created to export selected General Ledger Entries. As General Ledger Export Jobs are created, they will be displayed in the list box in the screen above.
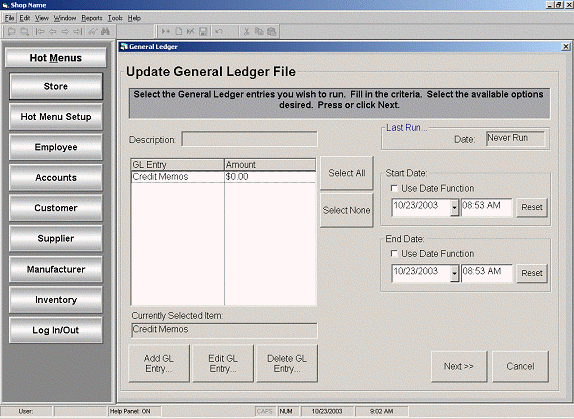
Click New to begin creating a new General Ledger Export Job and the Update General Ledger File screen will appear. All previously created GL entries will be displayed for selection or a new GL entry can be added.
Click Edit to modify the General Ledger entries currently selected for the General Ledger Export Job. The GL entries currently selected will be highlighted on the Update General Ledger File screen.
Click Delete to remove a General Ledger Export Job. Note: this will only remove the job name and not the selected General Ledger entries.
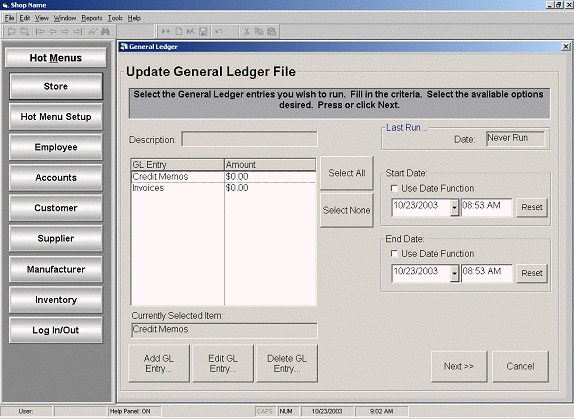
The Update General Ledger File screen will display all of the GL entries that are currently available for selection for this export job or a new GL entry can be added to the screen for selection. (Since this is a new export job, none of the GL entries will be highlighted.)
To begin configuring GL entries to export, click Add GL Entry, Edit GL Entry, or Delete GL Entry on the bottom left of the screen. These buttons will initiate the GL Export Wizard. The GL Export Wizard will prompt the user to select the applicable parameters needed to configure the GL Entry. We will return to the other settings on the right side of the screen later in this section.
Note: The GL Entry Amount field will display the value of $0.00 when setting up the system since there is no data in the holding area at this time. Running an export job places data in the holding area; creating the export file removes the data from the holding area and places it in a specified file. Running an export job without creating the export file will leave the data in the holding area and display dollar value of this data in the GL Entry Amount field. In a normal business cycle, an export file will always be created after an export job is run. Since the export file creation will automatically clear the holding area, the dollar value amount will normally reflect the value $0.00.
For our documentation example, we will create an export job containing two GL entries for Transaction Totals. The first entry for Credit Memos was previously added and is displayed in the above screen. We will now add a second entry for Invoices.
Click Add GL Entry or Edit GL Entry and the GL Export Wizard screen will appear.
Add GL Entries
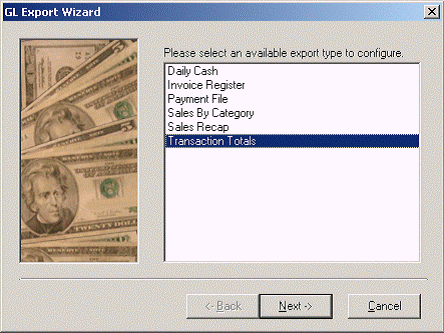
Select an available export type to configure from the screen list and click Next.
The available export types are:
Daily Cash
Invoice Register
Payment File
Sales By Category
Sales Recap
Transaction Totals
For our example, we will select the export type value Transaction Totals.
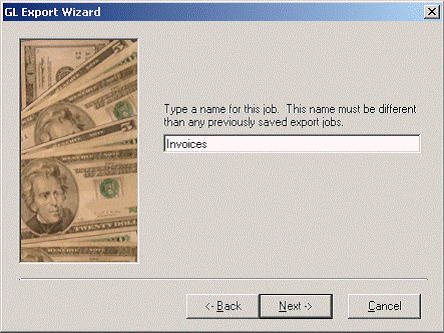
Enter a unique name that describes the data field being selected and click Next.
(Note: This is the name that will appear in the list of GL entries on the Update General Ledger File screen.)
For our example, we used the name Invoices.
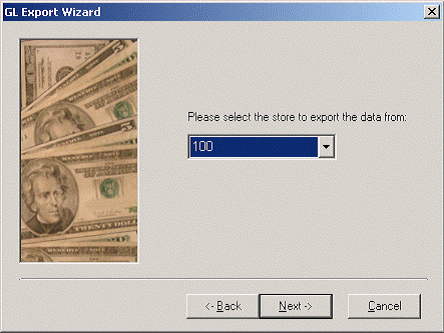
Select the store to export data from in the drop down list and click Next.
For our example, we selected store 100.
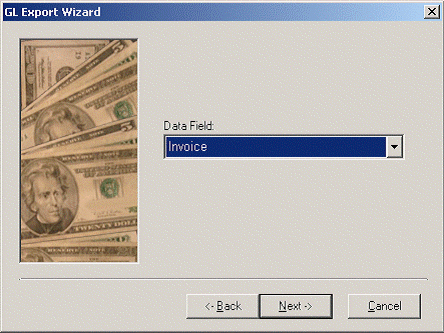
Select the Data Field value from the drop down list and click Next.
Note: the Data Field values will vary based on the export type selected previously.
For our example, we selected the Data Field value Invoice.
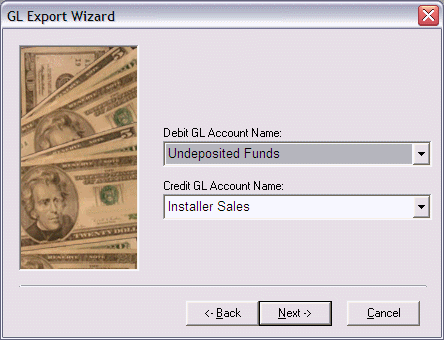
Select the Debit GL Account Name and Credit GL Account Name from the drop down lists and click Next.
The values listed in the drop down lists are the account names previously added in the setup of the Chart of Accounts.
For this example, select the account name Undeposited Funds for the Debit GL Account Name and Installer Sales for the Credit GL Account Name.
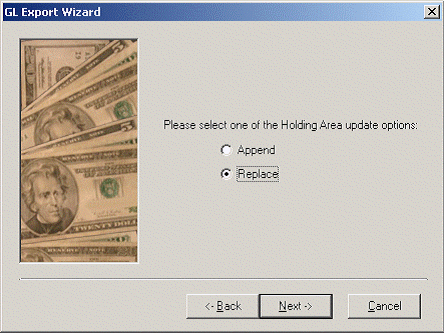
Set the Holding Area update to Append or Replace and click Next.
The data for an export job is copied to a file known as the Holding Area. If Append is selected, the gathered data will be added to any data already in the Holding Area. If Replace is selected, any data already in the Holding Area will be removed and only data gathered from the new request being run will be sent to the Holding Area.
For this example, set the Holding Area to Replace.
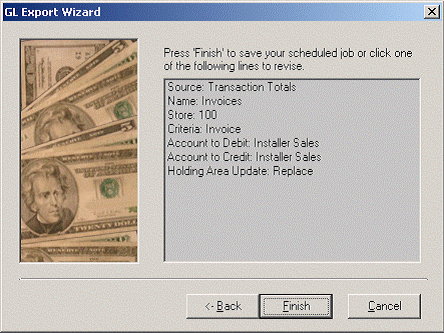
Click Finish to save the GL entry parameters or select a parameter line from the list to revise.
Clicking Finish completes the GL Export Wizard and returns to the Update General Ledger File Screen. The new GL entry will now be listed in the GL Entry box on the Update General Ledger File screen.
For our example, the screen displays the original Credit Memos entry and the newly added Invoices entry.
Edit a GL Entry
Select the GL entry from the list to modify and click Edit GL Entry.
This will open the GL Export Wizard; click Next to go through the screens and make any modifications. Click Finish when modifications are completed.
Delete a GL Entry
Select the GL Entry to be deleted and click Delete GL Entry.
A message will appear stating: Are you sure you want to delete the selected item: GL Entry name value? Click Yes to delete the GL entry, or click No to cancel the delete function.
Last Run date: For the selected GL entry in the list box, this will display the date the last time an export was run. (For the initial setup, the date field will display Never Run.)
Use Date Function check box: allows you to manage export cutoff periods by Day, Week, Month, Quarter, and Year. These cutoff frequencies are available for both the Start Date and End Date settings.
Start and End Date: These are the dates for the data to be gathered for export.
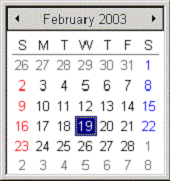
Click the Date drop down box and a calendar will appear allowing you to scroll forward and backwards by months when the arrow(s) are clicked.
A specific date can be selected by clicking it on the calendar.
You can also click in the date field to change or type a new date.
Click anywhere on the screen outside of the calendar to close the calendar
The Reset button will set the date field to the current system date with a time of 12:00 a.m.
When the configuration of all the GL Entries is complete, select the GL Entries to export and click Next.
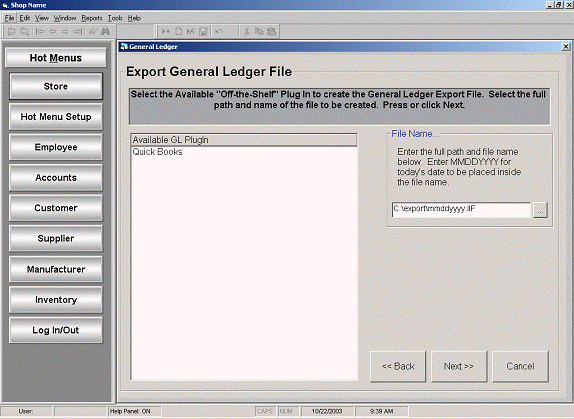
Select your accounting system software from the Available GL Plug In list box (ex: Quick Books) and enter a valid path and file name as noted below:
Click on the selected GL Plug In. (ex: Quick Books)
Enter a valid path and file name
The drive letter and folders must currently exist on your system.
Enter a name for the export file with an extension of IIF for Quick Books.
Using the letters mmddyyyy for the actual file name will cause the program to substitute the current date for these letters. For example, on January 1st, 2003, the 8-character file name mmddyyyy would be translated to 01012003.
Adding the file extension IIF results in the file name, 01012003.IIF for January 1st, 2003.
We strongly recommend using this 8-character letter string to automatically name the file with the date the file was created.
The path is user definable and should match the Local Path specified in the Upload Setting tab in File Transfer Settings.
Click Next to continue.
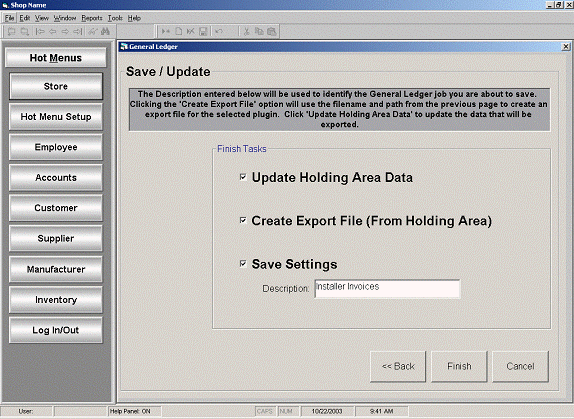
Save / Update
Setting the following parameters is the final step in creating a job to gather and export data.
Check the Update Holding Area Data check box to append/replace data to the Holding Area.
Check the Create Export File (From Holding Area) check box to create an export file.
Check the Save Settings check box to use the settings for this job again. The Save Settings check box only needs to be checked during the initial setup or when modifications have been made.
Enter a Description for the export job you have created.
For our example, Installer Invoices was used for the description.
Click Finish and the following screen will appear:
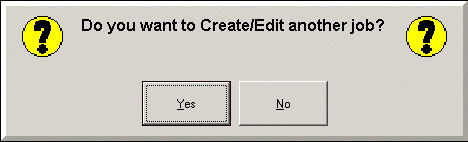
Clicking Yes will return you to the first screen in the process, the Open General Ledger Job screen. Clicking No will close the program.